If you are a beginner trying to learn git and looking for an article that lists down enough information to get you started, then keep reading!
 ◎ Git
◎ Git
What is Git?
Before answering the question, let’s familiarize ourselves with the concept of the version control system.
Version Control System
Imagine a situation where after hours of hard work and trial and error, finally you got your project working which you had been working for days. Now that you have a working project, you want to make sure you save a copy of the project safely somewhere so that you can retrieve it later just in case. Also, you now want to take the project to a whole another level but are too scared to make any changes fearing that one wrong change may cause the whole project to stop working. You are not alone, this problem is pretty common wherever we are building something incrementally like editing a photograph, writing an essay, or most commonly any project containing a lot of files and text.
To solve this problem, people came up with a system called Version Control System. At any point, you can ask your Version Control System to save the current status of your project. You are free to make any changes and if they work out well, you can command the version control system to remember this new status of the project, however, if the any of the changes do not go as planned, you can always ask version control system to go back to the status where everything was working fine. As you can see, this gives a lot of freedom to developers to experiment in the project and to go back in time and restore the project if any of the changes do not go well.
So what is Git? It is one such Version Control System, and a very popular one!
Getting Started with Git
Git is primarily a command-line tool, and it’s better to use it that way, though there are many good GUI tools available to use. If you decide to use the command-line interface of Git, let’s first make sure that you have Git installed on your computer and is ready to go. Open up your terminal or any other command-line tool and type the following.
|
|
|
|
However, if your output is along the lines of the following.
|
|
It means you will need to install Git in your machine. Installing git is quick, pretty straight forward, and a matter of running a few commands.
A quick Google Search around Installing git in mac/linux or Installing git in Windows should yield many helpful articles. Or Simply visit this guide.
Go ahead and install Git, Once you are done with that, we are ready to explore and play with Git.
The basic workflow of Git
In this section, let’s discuss the basic workflow of git along with some basic yet very powerful commands. Let’s say you are working on a project called mySummerProject. First off, let us inform git that we want to use it as a version control system for our project. To do this, go to the root folder of the project and run the following.
|
|
|
|
As soon as the above command is run, Git starts monitoring the project for any modifications. At any given point, you can ask git to give you the status of the project. This status typically tells you about any recent modifications done by you. Let’s create a file named projectStructure.txt as a modification to the project. To ask git about the current status of the project run following command.
|
|
The response generally looks like the following.
|
|
In short, the response from Git is trying to tell us that ever since I started monitoring this project, one file named projectStructure.txt was created and I am currently not bothered about any changes you make in that file.
If you do not understand a few keywords in the output like branch, master etc, do not worry, we will cover these in very detail shortly. Git can monitor the project and track any changes done inside the project by creating some files which help git keep track of things. These files are stored in a hidden folder called .git in your project directory. It is a good idea to not touch this hidden .git folder at all. This folder is created as soon as the git init command is issued. That also means if the .git folder is accidentally deleted or the git init command was never issued, Git does not recognize that project as a valid git project and throws following error if you try to get the status of the project using git status.
|
|
In our case, currently, Git is not tracking the changes done in the file projectStructure.txt, by default git does not start tracking any new file unless told. To command git to track a file for any changes, we can use the following command.
|
|
To add all the files sitting in the current folder for tracking, use the following command.
|
|
After you have done that, let’s check the status one more time by running git status command. This time, you should get something like this.
|
|
As we can see above, Git has now noticed the file as a new file addition in the project.
Now let say you go ahead and write some content in your projectStructure.txt file. Let’s see what git has to say when you check the status (git status) after making some changes in your file.
|
|
git add command again. What git add is actually doing is putting these files to an area called Staging Area. Do not worry, I will discuss the Staging Area in our upcoming section. First, its time to discuss the very next logical step in our git workflow which is finalizing our changes and saving them somewhere safe.
What is Git Commit?
Let’s say that you made some more changes in your existing file projectStructure.txt and added few more files, finally, you ran the git add command to tell git about the latest situation in your project. Now you are ready to run the following command. It is called git commit. So what actually happens when you run git commit? Simply put, git is taking a picture or snapshot of the current state of your project and keeping this information in its memory. Or in other words, git is noting down all the differences from the last time it had taken the snapshot. It is done in a very optimized manner to not waste memory resources. Now since git has noted the changes as part of this snapshot, they are kind of finalized and any new changes would have to be captured in the next snapshot capture or in the next git commit. Each commit has a unique identification number, however, we also need to provide a message as part of this command to easily understand what changes were part of this commit. You can add the message by passing the -m flag as part of the command. Here is how the actual command and its response looks like.
|
|
Now is a good time to discuss the staging area we have seen earlier.
What is Staging Area in Git?
As you know git constantly tracks the project for any changes, but what base git is using to compare that there are any changes? It is the snapshot that git has taken. For example, let’s say you make some more changes related to your project after your last commit, git will notice that the current state of the project is not the same as what it had captured a while ago as shown below.
|
|
Let’s say at this point, you decide that these changes are good and I want to add this much. You can do so by running git add command. Now, what git would do is promote these changes to a space called Staging Area. An important point to keep in mind is that only the changes up to the point when you ran git add will be considered for commit and any further changes done have to be reported again by re-running the git add command. This is particularly useful when some of your files are ready to be committed and there are some files you still want to work on, you can simply add the ones which are ready to Staging Area and subsequently commit them. Okay, now what? remember the files are still on our computer and if something happens to our computer, all our hard work goes in vain. To promote your files to a safe remote location we can use an online hosting service for your git projects or repository called GitHub. Let’s learn how to do that in our next section.
Pushing your Git Project to safety
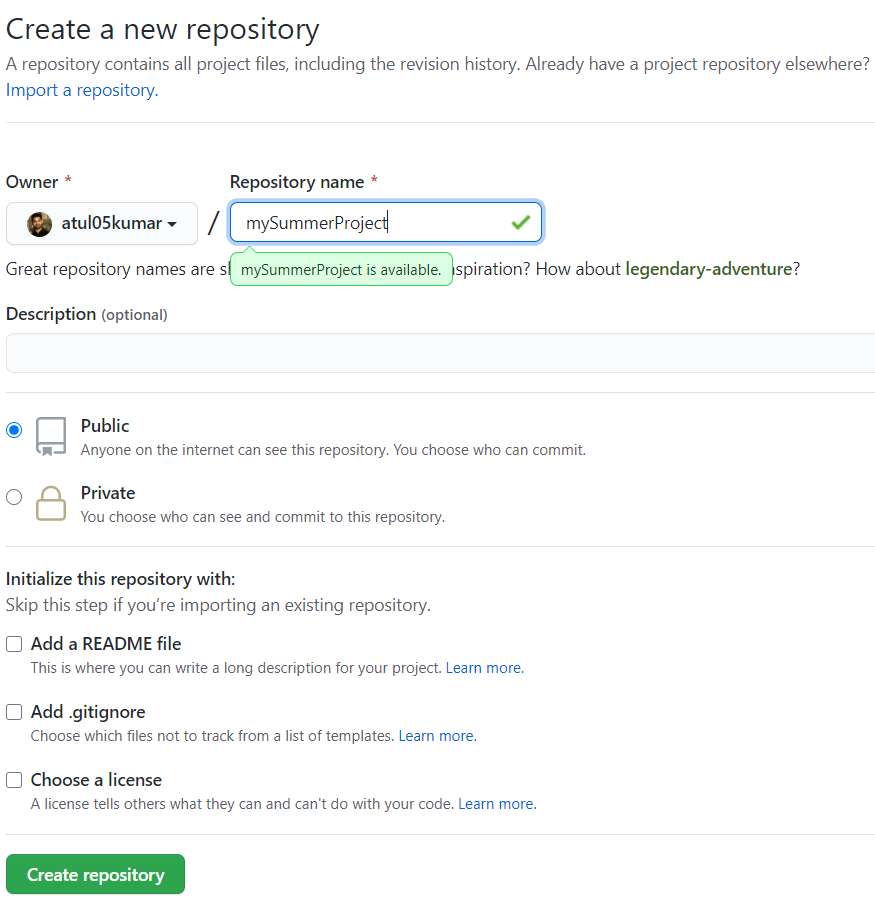
Let’s start by signing up on Github. Once you are all set with your account, simply click on New to create a new repository like below. Make sure to keep the repository name the same as your local project repository or folder name.
 ◎ Creating a new Repository on Github
Alright, I hope you were able to create the new repository. Once the new repository is created, you should see the following screen.
 ◎ Setting up your Git Repository on GitHub
Think of GitHub as a safe place at a
 remote location where your project copy will be safely stored, and you can download it again anytime if something happens to your local project sitting in your computer. Now, this remote location has an address, and that is what we precisely need in order to be able to push our project from our local machine to this remote Github location. Notice the yellow arrow pointing to this address we just talked about. Go ahead and copy this address from this page and we shall continue in our local git project. To tell git about the remote location where you want to copy your code, simply run the following command. You also need to give a nickname to each address you configure in git. This comes in handy to identify which address is representing what location. In this case, let’s give our address a nickname called origin.
|
|
|
|
|
|
Note: Sometimes, Git may ask you to provide your login credentials, simply provide that and it should work fine.
Let’s verify that our changes are indeed saved in the remote location. Go to your GitHub account and open the project repository that we created in the last step. It should look identical to your local project. If you are able to see that, then congratulations, you have successfully saved your project in Github Server.
 ◎ Project Repository after pushing the local project
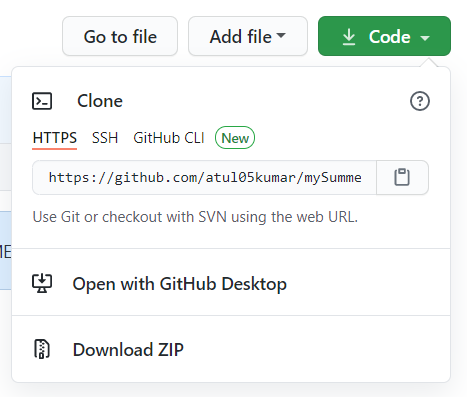
If you were able to follow along till here, Good Job, creating your first git project. Now go ahead and make some more changes in your project add them to Staging Area, commit them and push them to GitHub Server. Let’s discuss one last thing in our first step towards learning git. Let’s say, you want to share this project with your friend now. One day you visited your friend and want to work on the project together. Let’s see how can we copy or clone the project stored on the remote GitHub server to your friend’s computer. Simply visit the repository in your GitHub account and click on the Code button. You should see something similar to the below image.
 ◎ Clone Repo Dialouge Box
Copy the repository URL shown in the dialogue box. Once copied, head over to your friend’s computer and run the following command after replacing the repository URL with your repository URL.
|
|
Alright, you should now see an identical copy of the project is created in your friend’s computer. Go and work together, commit and push them to safety.
This concludes the first step of using Git, In this lesson, we have explored the basic workflow of git. Knowing this much of git is pretty useful and is most used.
We will explore topics like branch, fork, upstream etc. in the next step of our learning. Till then keep practicing and Happy Learning!